Showing posts with label daily craft. Show all posts

Thursday, February 27, 2014

Daily Craft - A paint swatch color book

We have a kitchen remodel coming up that is about to invade our house for the next couple of weeks.  This means we've been in and out of home improvement stores the last couple of weekends and, as a reward for his patience while we pick out backsplash and floor tiles, I decided to make Owen something using the paint swatches we'd given him to keep him entertained in the shopping cart (because it seemed safer than handing him power tools). 

Using this as inspiration, I set about making Owen his own color book.  I picked up a few sets of stickers at Dollar Tree (who carry a pretty decent selection of laser, 3D, and foam stickers) then went about matching the sticker colors to the swatches.  Once I'd decided on the color order, I used double-sided tape to stick the swatches to each other back to back.  Then I punched holes and bound them together using loose binder rings.  Finally, I personalized the front page for him.  I'm so happy with how it turned out!


I'm hoping that over time he can even add his own choice of stickers to the ones that I already included in the book.  That way it really is even more personal to him, as well as having the advantage of teaching him about his colors in a fun way!

There seem to be tons of paint swatch crafts out there, and I can kind of see why now that I've made this for Owen.  Very fun, not complicated.  Have you tried any yourself?  Please share if you have!

I'll be sharing photos of the kitchen remodel shortly as demolition starts on Monday - yikes!  In the meantime, I would also like to give Home Depot props for this sweet shopping cart, complete with steering wheel!  Owen loved "driving" like a big boy while I made our tile order.  

Thursday, January 2, 2014

Daily Craft - A Baptism Bookmark

Happy New Year folks!  2014 already?  I hope you all had a wonder-filled holiday season and that Santa was good to you. 

It's day 2 and being back at work seems like it came entirely too quickly.  Nonetheless, I'm feeling good about the upcoming year.  At the very least, I hope to spend more time out and about with Owen as he's now old enough to really start appreciating more activities - the zoo, museums etc.  I'm also thrilled that he's soon to be prime crafting age - more felt and paint for everyone!! 

This project is actually something I did a few weeks back, but I wasn't able to get it to the recipient until yesterday so didn't want to post anything lest I spoil the surprise.  Close friends of ours have a baby girl who was recently baptized.  I can't say I know much about appropriate gifts for baptisms but I did know I wanted to make something that she would (hopefully) treasure as she got older.  My original thought was a necklace, but then I found some simple shepherd's crook bookmarks and decided to go in a new direction. I wire wrapped some glass pearl beads left over from the jewelry I made for her baby shower, then added a small pink cross with Swarovski beads as the feature. 

I just love how this turned out and I really hope this is something she'll use for years to come to mark passages in her favorite Bible.  In the end, despite the convenience of the Kindle or Nook, reading a book on paper still can't be beaten in my eyes.  I bought more bookmarks so hopefully I can execute a few more ideas soon!

Friday, November 15, 2013

Daily Craft - This hat is a hoot!

I'm participating in another birthday swap with some Ravelry folk in one of the birth boards and was determined to find the time to crochet something fun for the recipient.  I seem to have much more free time in the evenings now that Owen has transitioned to regular milk and we got rid of the bottles.  Is that a good excuse to spend more time crafting?  I hope so!

Almost as soon as I started my search for a cute hat to crochet, I came across this rather fantastic owl hat from Repeat Crafter Me and knew it was the one. She's actually written the pattern in newborn through adult sizes, so nobody needs to feel left out! It was a quick pattern to work up and my only complaint would have been that I misjudged the size of the buttons to use for the eyes (although that's user error and the pattern writer should not be held responsible). 


I do hope the recipient loves it. It's just so cute that there may be more owl hats in my future...

Friday, October 11, 2013

Daily Craft - Birthday invites in a rush!

Has to believe that Owen is turning 1 next week.  People say that the time goes fast, and it's true.  Seems like yesterday he was a sweet little newborn, and now he's a fully mobile little dude with a huge personality.  We're keeping his birthday pretty low key and I was dithering back and forth for the longest time about whether to just send an evite (seeing as we're trying to keep things simple), or mail invitations (seeing as it's his first birthday).  In the end, I realized that we'd need to mail an invitation to Owen's great-grandmother at the very least, and the grandparents as a whole would probably like a proper invite.  Of course, I decided upon all this pretty last minute, which meant ordering and waiting for invitations to arrive probably wouldn't work.  Instead, I came up with a simple to make, but super cute (in my humble opinion at least) concept.

I designed a 4x6 card (using the My Memories Suite software, although any photo software could work).  I then got the photos printed at Walgreens, which generally isn't my photo printer of choice, but they conveniently offer 1-hour service and in-store pick-up.  The rest was some very easy construction.


Materials
- 12"x12" cardstock
- 4"x6" photos
- washi tape.

Steps
 - Cut the cardstock sheet in half to make two 6"x12" strips.
- Score the cardstock approx 2" from one end.
- Stick the photo onto the cardstock, up against the score line.
- Score on the other side of the photo.
- Fold both flaps over the photo, then
secure the flap and the sides with washi tape.
- Address and put on stamp.
- You're done.


It really was that simple and total cost of about $4 to make 15 invitations (not including postage).  If you wanted to, this leaves a ton of space for a personal message, which means it could work great for holiday cards.  The options for cardstock are endless too! 

I actually have a great giveaway coming soon from my sponsor, My Memories, who have fantastic digital scrapbooking software.  I have used it for invitations, holiday cards, photo collages, and it's currently housing the epic work-in-progress "first year" scrapbook for Owen.  Stay tuned...  :)

Tuesday, September 24, 2013

Daily Craft - Fun with washi tape

Not sure if you've heard of washi tape, but it seems to have exploded out of nowhere.  For a little while I've been wondering about it and when I saw some in the clearance section at Target, I had to buy it.  (Does anybody else cruise the end caps for random clearance items that you didn't know you needed, or is that just me?)

Last weekend, I had a vow renewal to attend for some good friends of ours and, in that I did forget to buy them a card at Target, I decided to play with the newly acquired washi tape and make my own.  I embellished "Congrats" using some stickers (also from Target).  The heart was made using a trick I'd spotted online - to cover a piece of paper the necessary size with the tape, then cut out the shape.  I also added some tape to the envelope to tie both pieces together.  I think it's simple, but cute!

The other card I made is for a friend's baby shower.  I used the washi tape as a background for the 3D stickers, then hand wrote the "congratulations" message.  I'll admit that hand-writing makes me nervous as, while I do have good cursive, it can be too easy to be critical of how the end result looks.  An alternative would be to print or stamp the message, but that's for next time! 

My favorite thing about washi tape has to be that it's completely re-positionable so, if you mess up, you can pull it off and start again.  There are so many cute tape designs out there and I can see how many potential uses it has.  Really, you could put this stuff on just about anything! 

Have you tried it?  I would love to know your favorite uses if you have.

Monday, September 9, 2013

Daily Craft - Edible finger painting

Since it's been so hot recently, I've been hesitant to take the wee one to the park for fear of burning his butt on the plastic bucket swings.  This means I've been searching for indoor activities and finger painting seemed like a great idea.  Owen still puts everything in his mouth so I needed edible paint and, with this paint recipe from Growing A Jeweled Rose (who is a wealth of handy info for baby and toddler activities in general), I figured I'd give it a shot and make some potato paint.  When I first shared my plan with Husband, he laughed at me and wished me good luck, but I was determined.  I armed myself with some sketch paper and potato flakes from the dollar store, stripped off the baby, laid a towel on his high chair to try and contain the mess, and made paints in red, yellow, green, and blue.


He wasn't quite sure what to make of it at first and needed some gentle encouragement, but was happy smearing the potato flakes around for a little bit.  He definitely tried to eat some, which I was anticipating.  Although I'm not quite sure he got the concept, he seemed to be curious nonetheless.  It pained me a little bit to admit that I probably spent more time cleaning up than actually painting, but I think we still had fun and I have a pretty neat (albeit lumpy) picture to show for it.  

If you are curious about clean up, the food coloring was sufficiently sucked into the potato flakes that it didn't make a mess and wiped up nicely.  The only bit that didn't wash off immediately was the couple of drops I got on myself when making the potato paint in the first place.  Overall, a success!  What are your favorite indoor activities?  We're always open to suggestion.

Wednesday, August 28, 2013

Daily Craft - A birthday swap!

In the October birth group on Ravelry, we elected to do a swap in honor of the pending birthdays of our little ones.  It was a secret swap and, as my partner has no clue who their package is coming from, I'm going to share the contents here.  A little pampering for both mom and baby for making it this far!

Here it is in it's entirety.  (Not a fancy background, but this is what happens when you forget to take pics at home and end up doing so at work in the commissary on top of the pool table with your cell phone...)


Top row (left to right)
- some British themed loose leaf tea.  I love the little tins too and would definitely need to repurpose
- vintage photo notecards
- our favorite Sandra Boynton book "Moo, Baa, La La La!"

Middle row
- a tea pouch that I sewed with some of my favorite teas in it, along with dried chamomile flowers to add
- crochet stitch markers that I made
- Sesame Street toddler socks (they were too cute!)

Bottom row
- Josh Groban's last studio album, and the "Whip It" soundtrack
- a couple of soft acrylic yarns from my stash
- puffy bath books (which are also a favorite for Owen)

I certainly didn't get to craft as much for this swap as I have for swap packages in the past, but I still had a blast putting it all together and was happy to add a couple of handmade touches at least.  I have a package coming my way from somebody and can't wait to see what's in it! 

Tuesday, July 23, 2013

Daily Craft - Sensory toys, overload!

Yet another thank you to Pinterest for introducing me to the world of sensory toys.  After perusing a variety of pins and written down ideas for those that I liked, I decided that this was going to be a weekend of making sensory toys for Owen.  I settled on the idea of some bottles and some bags, and set off to the local dollar stores for supplies.  I may have gone a little overboard, and I think Husband was surprised/amused by the variety of things I brought home.  He was quickly swayed though because these sensory toys are just as much fun for us adults as they are for the little ones.  (In fact, I think it's fair to say that these could totally work as office items for those moments when you want to drop kick your computer and need to put yourself in a quick time-out.)

Step one is to gather materials.  Not pictured here are the bottles and the freezer ziploc bags.  That being said, everything can be purchased at a dollar store, which makes these really inexpensive to do.  I think the cost of each was in the range of $0.50 to $1.  The "recipes" I used are below each picture, but there really is no limit to what you could put together.  I still have a ton of other materials, but I'll be putting those together at a later time.

First up, the sensory bags!  For each of these, I used a quart sized freezer bag and colored duct tape to reinforce the edges/closures.  It is recommended to use freezer bags as they're more durable against little teeth but, if you don't have any on hand, doubling up regular bags should work.  I used enough hair gel that the bags felt suitably squishy but wanted to make sure that it was still possible to manipulate the items inside.
 
CLEAR HAIR GEL WITH FOAM LETTERS
BLUE HAIR GEL WITH GOOGLY EYES
CLEAR HAIR GEL WITH ERASERS
For the sensory bottles, the hardest part might have been finding the right bottles.  I've seen people use Voss bottles, which are the perfect shape, but not super easy to come by.  I ended up finding small Vitamin Water bottles, which were 2 for $1 at the dollar store.  To remove the sticky residue from under the labels, I ran the empty bottles under warm water for a minute, then used some vegetable oil on a paper towel to gently rub away the residue.  Then, I gave the bottle a good washing.  I preferred that method of removal over others because at least oil isn't toxic should Owen lick some (based on the assumption the bottle is going to end up in his mouth at some point!)  Also, to ensure that little hands don't take the top off the bottle and ingest what's inside, you'll want to super glue the lid on once you've filled them. 

- FILL BOTTLE 2/3 WITH WATER. 
- ADD BLUE & GREEN FOOD COLORING.
- ADD BLUE GLITTER
- FILL TO TOP WITH BABY OIL

This one is like an ocean wave and the glitter stays in the oil, which makes for a fantastic effect when the occasional oil bubble breaks off into the water!

- FILL BOTTLE 3/4 FULL WITH WARM WATER
- ADD DROPS OF RED & BLUE FOOD COLORING
- ADD ONE SMALL BOTTLE OF GLITTER GLUE
- ADD GLITTER IN DIFFERENT COLORS (RED, PINK, GOLD)
- TOP OFF WITH WATER


It took a little bit of shaking for the glitter glue to properly absorb into the water so use that an excuse to play with this one for a bit!  What I love about this is that it's like lava.  The glitter will start to separate and swirl both upward and downward.  The more glue you add, the longer it will take for the glitter to settle.  I also like that the glitter in the glue is finer than the other glitter that I added, which gives the appearance of multiple textures.

- FILL BOTTLE WITH SMALL BAG OF PONY BEADS
- ADD A SMALL AMOUNT OF GLITTER (OPTIONAL)
- FILL TO TOP WITH WATER

This one is definitely the easiest, but still has a ton of appeal because the beads also make noise while you swirl them around, plus there are lots of different colors to look at. 

Of course, this post wouldn't be complete without an action shot, so here's Owen enjoying his new toys.  I enjoy the guilty look he's got in that picture on the right!


Have you heard of, or made, these sensory toys before?  When he's older he can help me make them but, until then, I think all of us in the house will have the opportunity to enjoy these!

Sunday, June 30, 2013

Daily Craft - Some earrings!

This weekend, I threw a baby shower for a good friend of mine who will be having a baby girl in September.  It's really had my creativity flowing but, of course, I've not been able to post anything about it previously for risk of giving anything away to those that would be in attendance!  I'm going to start with my earrings though, which were part of the prize bags for the various games.

The theme for the shower was pink and brown, on account of the mom-to-be's last name being Brown, and her having a girl.  I immediately knew that I wanted to make some pink and brown jewelry for the prizes.  I picked up some glass pearls and fished around for antiqued brass findings in my stash.  In that there would be a variety of different age groups being represented, I was hoping for something somewhat classic.  I packaged them with lotion, a compact mirror, and a magnetic notepad.  I'm hoping the winners enjoyed their haul!


My co-host found a polka dot card stock that she used for the invitations, which then became part of the theme, so I was happy to make some nifty packaging with that card stock too.  (More on the packaging to come later.)  I actually love this color combo, so thinking I'll make some more with the supplies that I have left over.  Watch out for those!

Tuesday, May 14, 2013

Daily Craft - My design needs your vote!

You may remember a few weeks back that I won a set of beads through Artbeads' "Tuscon Ten" contest.  So, part two of the contest was to create a design using those beads, with the beads making up at least 50% of the design.  Usually, I just let inspiration come to me when thinking about jewelry pieces, so it was different to have the parameters of my design set by the beads in hand.  The biggest challenge I faced was figuring out how to combine the different sets of beads, which I may not think to put together under other circumstances. 

In the end, I designed two necklaces.  The intent was that they could be worn separately, or together.  The first necklace used the giraffe beads combined with the tiny peacock pearls, and wire wrapped together with antiqued brass wire.  The second necklace tied in the antiqued brass with chain, and I decided to go with a lariat style so that I could feature a couple of the larger beads at each end.  I think the end result ended up being pretty cool!

Now onto the second part of the contest though.  I could win a giftcard from Artbeads for my design and could use your help!  If you could take a minute to vote for my design, please scoot on over to this Facebook page.  Voting is open through May 20th.  You can also check out the designs on the Tuscon Ten Pinterest Board.  Thanks all! 


Thursday, April 18, 2013

Daily Craft - I'm a winner!

My favorite beading supply store, Artbeads, holds contests over on their blog.  Recently, I entered to win a selection of beads from the Tuscon Gem and Mineral show.  As usual, I promptly forgot about it until the e-mail came saying that I'm a winner!  Even better, this happens to be a two-fer.  I have a month to create a design using the beads and then I'm pitted against the other 9 winners for a $50 gift card.


The beads arrived today and they're really pretty in person.  I've already been sketching some concepts.  I'm thinking bohemian...earthy...rock carving inspired.  It's somewhat outside of my comfort zone as I tend to think in terms of symmetry but, for this, I need to think more in terms of balance.  I'm excited for the challenge and will let you know when part 2 of the contest is up so you can vote for me (I hope!)

Monday, September 24, 2012

Daily Craft - More tiny stitches

I am very impressed that, only 3 months after starting the project, I am so far along with my cross-stitch birth announcement. Cross-stitching is a labor of love, that's for sure. The advantages for this particular pattern are that there were big areas using the same thread that didn't involve switching between colors or having to repeatedly count to make sure that a single x wasn't missed. The background is complete....but now I'm working on the back-stitching.


I should note that I have a bit of a love hate relationship with back-stitching. I love how it looks, but I hate the fact that you think you're done with the piece, and then realize that you still have a ton of tiny outline stitches to do before it's finished. These stitches that seem like they'll take as long as it did to do the background.  You can see how much difference it makes in this picture though - all the definition and detail comes through.  So, I'll keep stitching on and with any luck I'll be done by the time we head to the hospital (although I swear I'm not going to feel bad if I'm not!)

Thursday, September 13, 2012

Daily Craft - Quite Charming

For any of you who ever go to Big Lots, you probably know that you can find some very random things.  Most recently, I found some fabric charm packs on sale for $3.  I grabbed a couple, although wishing now that I'd purchased more - as with any overstock type store, you can never guarantee that the item will be there if you return at a later date.


I decided to dive right in using a simple quilt pattern to showcase the charm pack.  It's coming together quite quickly, so I'll have more to show for it soon.  My only problem is that I enjoy making the patchwork tops, but don't love the quilting part (seeing as I already have another quilt top waiting to be quilted in the closet).

Do any of you quilters have that issue...or any suggestions on how to get over the quilting hump?

Tuesday, September 11, 2012

Daily Craft - Crate covers

Finally got myself organized, so here's to my other recent sewing project.  You know those stackable plastic crates that you can get at office supply stores?  They're great for storage, but not all too pretty.  I happened across this tutorial on Pinterest on how to sew covers for said crates and knew that it would be perfect to make some cute storage for the nursery.


I used crates that I bought several years ago at Target ($2.50 a piece I believe).  They'd been storing some random crap in my closet from a while back, and I cleared out the junk when we got ready for the carpeting.  [Note the pretty new carpet by the way - we're really happy with it.]

I found both the striped fabric, and the fabric used for the interior of the crate in the clearance section at Joann.  Fabric cost was under $10 and enough to make covers for 2 crates, with plenty left over.  Total cost ended up being about $15 for the pair, which I consider quite a steal for customized storage.  Plus, they only took about an hour to make.

I'm loving that I can use these for safe, low level storage of books or toys.  I also love that the covers are easily washable, which from what I hear is important when babies and toddlers are involved.  :)

Seeing as there are several more of these crates around the house that are storing various things, I kind of want to cover them all so that they can be displayed more prominently!

Wednesday, September 5, 2012

Daily Craft - Planes, trucks and stuff

Hope you all had a lovely long weekend.  I made it a super long weekend by taking yesterday off with no intent other than to get some sewing done.  I'm still debating the best way (or if it's even possible) to share my sewing space with baby, as the nursery has been my craft space up until now, and I've been happily utilizing the dual closets for supply storage.  However, husband has graciously offered to let me move my craft space into his "man cave" once we've cleared some room.  In the meantime, I figured I'd take advantage of not having the baby furniture yet, and spread out my fabric!

I started off with sewing this panel that I bought on sale at Joann's.  I'd never really looked at the panels before, but this has changed my mind.  It was $6 and I loved the patchwork & applique....it makes it look like I did something much fancier than I did!  It's also got a nice variety of textures between the flannel, minky and felt on the front.  In the end, I just sewed some snuggly minky fabric (which I'd also purchased on sale and was already in my stash) on the back and called it a day.  Total cost?  Approx $10.  Super cute and cost effective?  I consider that a win! 


[Sorry these aren't the best pictures, but my preggo self didn't feel like walking down and then back up 2 flights of stairs to get my other camera.]


Next post...some crate covers thanks to a tutorial found on Pinterest!

Friday, August 24, 2012

Daily Craft - Playing with wire

While all my craft stuff was packed away and mostly out of reach, the one thing that I did have access to was my jewelry making supplies.  It all started with a tutorial for half herringbone wire wrapped beaded drops.  That resulted in me attempting the technique on several different beads.  My best efforts were a pair for myself, and a variation that is now in my shop.  I just love how simple but elegant the design is, and how the wire really highlights the beads.

A pair for you?
A pair for me!

Of course, this got me started with admiring other wire wrapping online, which led to checking out hammered wire pieces, and....well you know how it is when you start down the rabbit hole.  Next thing you know, I had to order a hammer, steel bench block, and more wire to play with.  Those supplies arrived last week, which resulted in a copper bracelet (photos to come in a future post), and yet another supply order for some items with which to give the wire a beautiful patina.  Yup, I've lost myself in yet another crafty vortex; however I'm thrilled that I'm going to be offering some fun new jewelry in my store soon, once I've perfected some new techniques!  In the crafty world, does it ever just stop with one thing?  

Wednesday, August 15, 2012

Daily Craft - The other thing I knit

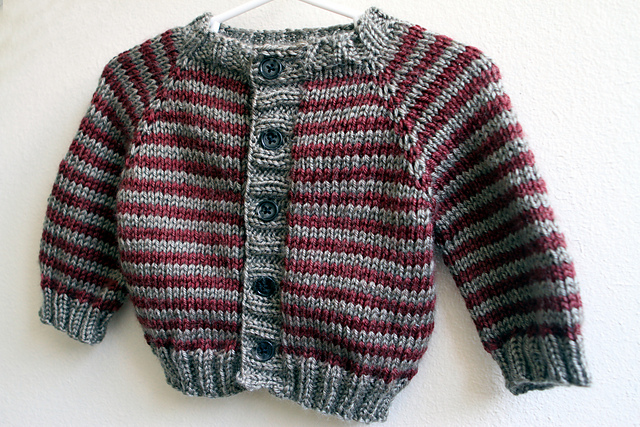
I shared with you the blanket that I finally took pictures of, and now to share the other thing that I knit up for the little one. Baby's first cardigan!  I also started knitting this before knowing gender, so went with what I hoped were relatively neutral colors.  I think it'll work out just fine for baby boy.    :)

Even after sorting through the many, many piles of baby clothes, I'm still in awe of how tiny each piece of clothing actually is.  I know this picture would look much more inspiring if it were on a real life model rather than a plastic hanger. I'll have to take an 'after' picture when he's actually big enough to wear it!


Sunday, August 12, 2012

Daily Craft - A finished blanket

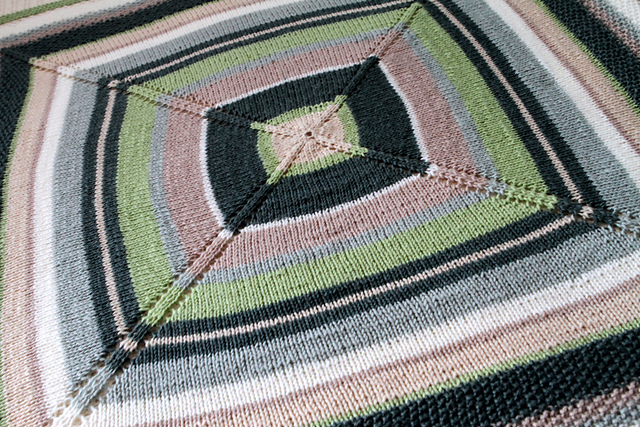
You may recall that I started a baby blanket a while back.  I actually started it before I even knew that we were having a boy, and had elected to knit up neutral beige/greens.  At the time, I had also decided to incorporate a pale blue, which is a nod to the fact that I suspected he was a boy all along.  

While I've been making various things all at the same time, I'll admit that I finished the blanket a few weeks ago and had put it aside for blocking.  Seeing as it's knit in an acrylic/micro-fiber blend, steam blocking was required and I only just managed to get around to doing that.  It could probably use a little more work to square it out, but I'm sure running it through the dryer a couple times will probably take care of the last part.    

Here it is though - one super soft blanket, which I adore and can't wait to snuggle the little guy in it.  :)  


Wednesday, August 1, 2012

Daily Craft - A custom made necklace

While I am definitely in baby mode when it comes to my recent crafting, I was asked to make a necklace for a co-worker.  When time permits, I'm all about making custom pieces as it makes me think outside of the box and create something that I may not usually do.  I've also been frighteningly neglectful of my online shop since getting pregnant, so jumped at the chance.

In this case, it ended up being a beautiful smokey Swarovski briolette, wire-wrapped to a quatrefoil link.  Now that I've made the finished item, I love this design and need to make more like it!

Friday, July 27, 2012

Daily Craft - Up, Up & Away!

I mentioned that I'd be making a hot air balloon mobile, and wanted to share my progress as it's already just about the cutest thing ever and all I've done so far is cut out the pieces!  A shout out to Jess over at Craftiness is Not Optional (one of my favorite blog names) for this fantastic tutorial.

Deuce figured he'd be helping out if he tried to chew on the felt pieces while I put them out for a photo...

This is a proper preview. Adorable right?


I modified the baskets a little bit, and I'm not sure how I plan to hang it.  I don't really have the tools to fashion the top that the original tutorial uses, so considering other options once I have an idea of how much the clouds and balloons weigh.

I'm 98% done with my two knitting projects as well, so more info on those coming up soon!!  Hope your weekend is shaping up to be a great one.  :)