For any of you who ever go to Big Lots, you probably know that you can find some very random things. Most recently, I found some fabric charm packs on sale for $3. I grabbed a couple, although wishing now that I'd purchased more - as with any overstock type store, you can never guarantee that the item will be there if you return at a later date.
I decided to dive right in using a simple quilt pattern to showcase the charm pack. It's coming together quite quickly, so I'll have more to show for it soon. My only problem is that I enjoy making the patchwork tops, but don't love the quilting part (seeing as I already have another quilt top waiting to be quilted in the closet).
Do any of you quilters have that issue...or any suggestions on how to get over the quilting hump?
Thursday, September 13, 2012
Tuesday, September 11, 2012
Daily Craft - Crate covers
Finally got myself organized, so here's to my other recent sewing project. You know those stackable plastic crates that you can get at office supply stores? They're great for storage, but not all too pretty. I happened across this tutorial on Pinterest on how to sew covers for said crates and knew that it would be perfect to make some cute storage for the nursery.

I used crates that I bought several years ago at Target ($2.50 a piece I believe). They'd been storing some random crap in my closet from a while back, and I cleared out the junk when we got ready for the carpeting. [Note the pretty new carpet by the way - we're really happy with it.]
I found both the striped fabric, and the fabric used for the interior of the crate in the clearance section at Joann. Fabric cost was under $10 and enough to make covers for 2 crates, with plenty left over. Total cost ended up being about $15 for the pair, which I consider quite a steal for customized storage. Plus, they only took about an hour to make.
I'm loving that I can use these for safe, low level storage of books or toys. I also love that the covers are easily washable, which from what I hear is important when babies and toddlers are involved. :)
Seeing as there are several more of these crates around the house that are storing various things, I kind of want to cover them all so that they can be displayed more prominently!
I used crates that I bought several years ago at Target ($2.50 a piece I believe). They'd been storing some random crap in my closet from a while back, and I cleared out the junk when we got ready for the carpeting. [Note the pretty new carpet by the way - we're really happy with it.]
I found both the striped fabric, and the fabric used for the interior of the crate in the clearance section at Joann. Fabric cost was under $10 and enough to make covers for 2 crates, with plenty left over. Total cost ended up being about $15 for the pair, which I consider quite a steal for customized storage. Plus, they only took about an hour to make.
I'm loving that I can use these for safe, low level storage of books or toys. I also love that the covers are easily washable, which from what I hear is important when babies and toddlers are involved. :)
Seeing as there are several more of these crates around the house that are storing various things, I kind of want to cover them all so that they can be displayed more prominently!
Monday, September 10, 2012
Daily Ramblings - 32 weeks
![]() |
| Stormy skies when leaving Olive Garden after dinner last night. Love it when it's moody. ;) |
This morning, I had my 32 week check-up. Everything is looking good, and it says something when you spend more time discussing cell phone ringers during your visit than you do any concerns that the doctor has (i.e. there were none). The number of weeks I have to go is in single digits, which seems so strange. I feel like we have a ton of stuff to do, but also feeling quite calm about it all - perhaps because I'm not entirely sure where to start!
- Our crib and dresser should be working their way to our house soon so we can get those built, then work on decorating the walls in the nursery.
- I made my tentative list of things for the hospital bag, so plan to start putting it together in the next week or two.
- We secured a daycare spot on Friday, which is a huge relief in itself as it's good to know we have somebody we like lined up to look after #weebabyjacobs (yes, my unborn has an unnecessary hashtag in all Facebook references thanks to a friend of ours...who knew it would catch on?)
- Speaking of names, baby's still nameless for now. I believe it's driving husband's grandmother crazy that we haven't picked a name yet, and she seems more anxious about it than we are! We've narrowed it down though, so making progress.
In the meantime, while I actually DID remember to grab my camera this morning to take some photos of what I've been sewing, I didn't have a chance to get the pics off the camera. I'll get organized eventually, I swear! :)
Wednesday, September 5, 2012
Daily Craft - Planes, trucks and stuff
I started off with sewing this panel that I bought on sale at Joann's. I'd never really looked at the panels before, but this has changed my mind. It was $6 and I loved the patchwork & applique....it makes it look like I did something much fancier than I did! It's also got a nice variety of textures between the flannel, minky and felt on the front. In the end, I just sewed some snuggly minky fabric (which I'd also purchased on sale and was already in my stash) on the back and called it a day. Total cost? Approx $10. Super cute and cost effective? I consider that a win!
![]() |
![]() |
[Sorry these aren't the best pictures, but my preggo self didn't feel like walking down and then back up 2 flights of stairs to get my other camera.]
Next post...some crate covers thanks to a tutorial found on Pinterest!
Friday, August 24, 2012
Daily Craft - Playing with wire
While all my craft stuff was packed away and mostly out of reach, the one thing that I did have access to was my jewelry making supplies. It all started with a tutorial for half herringbone wire wrapped beaded drops. That resulted in me attempting the technique on several different beads. My best efforts were a pair for myself, and a variation that is now in my shop. I just love how simple but elegant the design is, and how the wire really highlights the beads.
Of course, this got me started with admiring other wire wrapping online, which led to checking out hammered wire pieces, and....well you know how it is when you start down the rabbit hole. Next thing you know, I had to order a hammer, steel bench block, and more wire to play with. Those supplies arrived last week, which resulted in a copper bracelet (photos to come in a future post), and yet another supply order for some items with which to give the wire a beautiful patina. Yup, I've lost myself in yet another crafty vortex; however I'm thrilled that I'm going to be offering some fun new jewelry in my store soon, once I've perfected some new techniques! In the crafty world, does it ever just stop with one thing?
|
|
Monday, August 20, 2012
Daily Tip - Foaming soap!
Today I have a simple household tip to share, inspired by husband's complaint that the new soap I'd put in the kitchen wasn't lathering enough. I'm not sure if he's become accustomed to the foaming soaps that I'd picked up at Bath & Bodyworks, or if the dispenser for the soaps I'd grabbed at Bed Bath & Beyond ($1/each on clearance) just sucked. Seeing as we still had the foaming soap dispenser, the answer was actually very easy! Pouring regular soap into the foaming soap dispenser on it's own won't work because the soap is too thick and will clog the dispenser. All you need to do, however, is add water. We put in a mixture of 1 part soap to 4 parts water, then gently mixed it together. At first it wasn't mixed enough so the dispenser didn't want to foam properly, but I figured it was just because the soap was still somewhat settled at the bottom and was too thick. We tipped the bottle back and forth a few times to mix it up again, and it was soon working perfectly.
$0.20 vs. $3 for a container of soap. When the other foaming soaps in the house run out, I think we'll continue to use this refill method. Definitely a worthwhile savings!
Wednesday, August 15, 2012
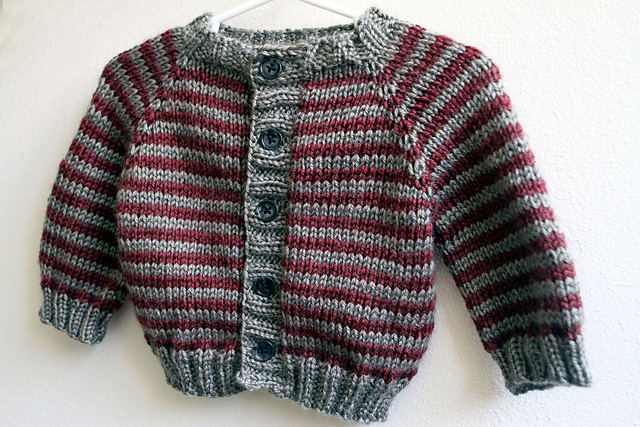
Daily Craft - The other thing I knit
Even after sorting through the many, many piles of baby clothes, I'm still in awe of how tiny each piece of clothing actually is. I know this picture would look much more inspiring if it were on a real life model rather than a plastic hanger. I'll have to take an 'after' picture when he's actually big enough to wear it!
Subscribe to:
Posts
(
Atom
)